As I was just looking back over some of my posts and especially at previous tutorials, I thought it would be fun to do another one. So, here goes. And as usual, I'm using a really bad photo to start with. But to its credit, the photo has some really good colors and lines and textures to work with. This photo here is one of the absolute worst I have ever taken. Why it turned out so bad is a whole other post. It's just bad and it isn't the only one I took that day that turned out bad.
Remember, to get the full effect of this tutorial, double click on the photo to get full screen.
So, just to take some time out to experiment with some software settings I had not used before, I decided to see what might happen if I tried a few. This was using curves intense. This was the only one I liked. And really, it's BAD. There's nothing redeemable about it. Or is there?
Well, there is color. There are lines, angles, textures. Hmmm...
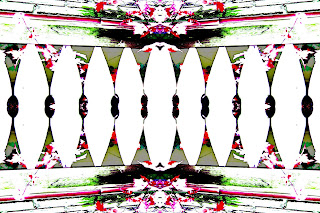
I decided to try out my favorite kaleidoscope filter from the Mehdi group. This setting was 2 petals, 0 offset, 0 rotate, and 1 zoom out. Well, now that's interesting. The more I look at it, the more I like it. Yet, I'd like a little less white.
This time I wanted to see what would happen if I worked on the
colors only. So I tried Luminares Color Glow. Wow, I love this shade
of blue, but this is a little overboard. But I'm not giving up. I'm
seeing more and more potential here. So I keep going.
Back to the ole favorite kaleidoscope. This time it was 2 petals,
46 offset, 0 rotate, and 1 zoom out. That's much better. But I'm not
finished yet.
Okay I don't really like all that blue even though it is interesting. So I back up a couple steps back to the kaleidoscope directly above the first blue picture. Yep, that's the one, with the all white pickets going across the middle and the colors top and bottom. This time instead of more kaleidoscopes, I chose to use Toadies filter group and the filter called Picasso's Other World. You can certainly see the cubism there. I am really liking this one. But let's see what else can be done.
At this point, still avoiding more kaleidoscopes because there are just times when I can almost feel that I need something totally different, I have chosen the same filter group that has the kaleidoscope filter. But this time I have chosen a filter called Melt within the Mehdi filter group.
Wanting to give it something...not quite sure what yet...but I am trying the filter group called Simple and the effect called Blintz.
Well that has possibilities, but I've still not gotten what I am looking for, and that is something that just pops out at me and says, "YES! This is it!"
So now I am going to try one more very easy filter that comes with the Paint Shop program and that is found under the title of Distortion Effects. The effect is called Displacement Map.
And that's my YES!
I could keep going, but I am going to stop there. I am happily satisfied with this result and feel that I have gotten not one but two pretty awesome pieces of art out of this. The first one is the one where I used the Picasso's Other World and got such an interesting cubism piece. And then this last one above here.
So did you follow along and do some experimenting of your own? I hope so. That's what makes this fun.


