Just a quick note to update what is happening with Capirani Photography.
1. Flickr Account has been closed as of 3/6/19.
2. Twitter Account has been deactivated as of 3/7/19.
Currently, Capirani Photography is on hiatus until further notice.
Thursday, March 7, 2019
Saturday, October 1, 2016
GONE!
Oh my gosh!!!!
Okay, I've let a lot of things slip this summer, especially photography. To be honest, I don't think I have picked up my camera more than 5 times all summer, apart from a short vacation at the end of May. I find that sad.
Yet on the other hand, I haven't been exactly dormant when it comes to art. I've been exploring the other areas, as I mentioned in the previous post. Painting, oil pastels, colored pencils mostly, along with some collage and mixed media. Most of what I've done has been in art journals I have created from scratch after learning how from YouTube videos. (Anything you want to learn you can probably find a YouTube video about it.)
But now that summer is officially gone, some other things are now gone as well. First, I ended (temporarily maybe) my relationship with Fine Art America while I figure out what my next steps are going to be. I can always go back easily enough.
Secondly, I ended my relationship with Xanadu Gallery in Scottsdale, AZ. Granted this was only an online relationship as far as displaying my photography and digital fusion photography. My work was not on display within the storefront gallery. I could still continue to show up to 10 works of any kind of art for free, but without selling anything there, it was getting to be too much on my wee budget to continue paying for unlimited art display and a website. I gave them two years and that was quite enough. To be honest, that was a total experiment on my part from the start. Up until I had taken the email course to prepare for gallery showing, I had not even considered gallery shows. I was looking in a totally different area.
Thirdly, my Facebook page for my photography is on temporary hiatus while I decide what my next course of action will be.
I did keep my domain name even though at the present time it connects to nothing. I am exploring WIX for my next website. Then again, I might just take a swing at designing my next website myself. It wouldn't be the first time.
Okay, so Xanadu's gone. Fine Art America is gone. Facebook is gone. What's left?
Well there is this blog for one, (and the other one called page 2.) Flickr is still filled with my images taken over the past few years. And oh yeh, I am on ViewBug. Have you tried ViewBug? There are lots of fun contests and challenges. You can win prizes with the contests; and the challenges allow you to see how others like your work. You can also choose to sell your work on ViewBug. I have not tried that yet. I only have a few of my photos on ViewBug so far due to only uploading those that I think might do well in a contest or challenge. At this point, I am taking it quite slowly. It is a paid account for the pro status.
So, there you have it. Some major steps taken now that summer has ended and autumn is here with all its glorious colors. While I am still mostly spending time with the hands on type of art right now, my mind is working to make some decisions as to the next steps to take with my photography. One of the things I am considering is how to use my domain name since it only applies to photography. For example, should I keep the straight photography separate from the digital fusion photography? Should I place all the digital fusion photography into a fine art category? Xanadu got my mind on high pricing and I am just not that style photographer at this point. So I have a lot to think about and plan, and though I am not in any great rush, with only three more months left to the year I am thinking maybe to have something in place by the end of this year.
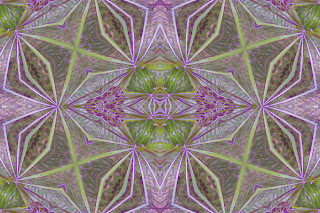
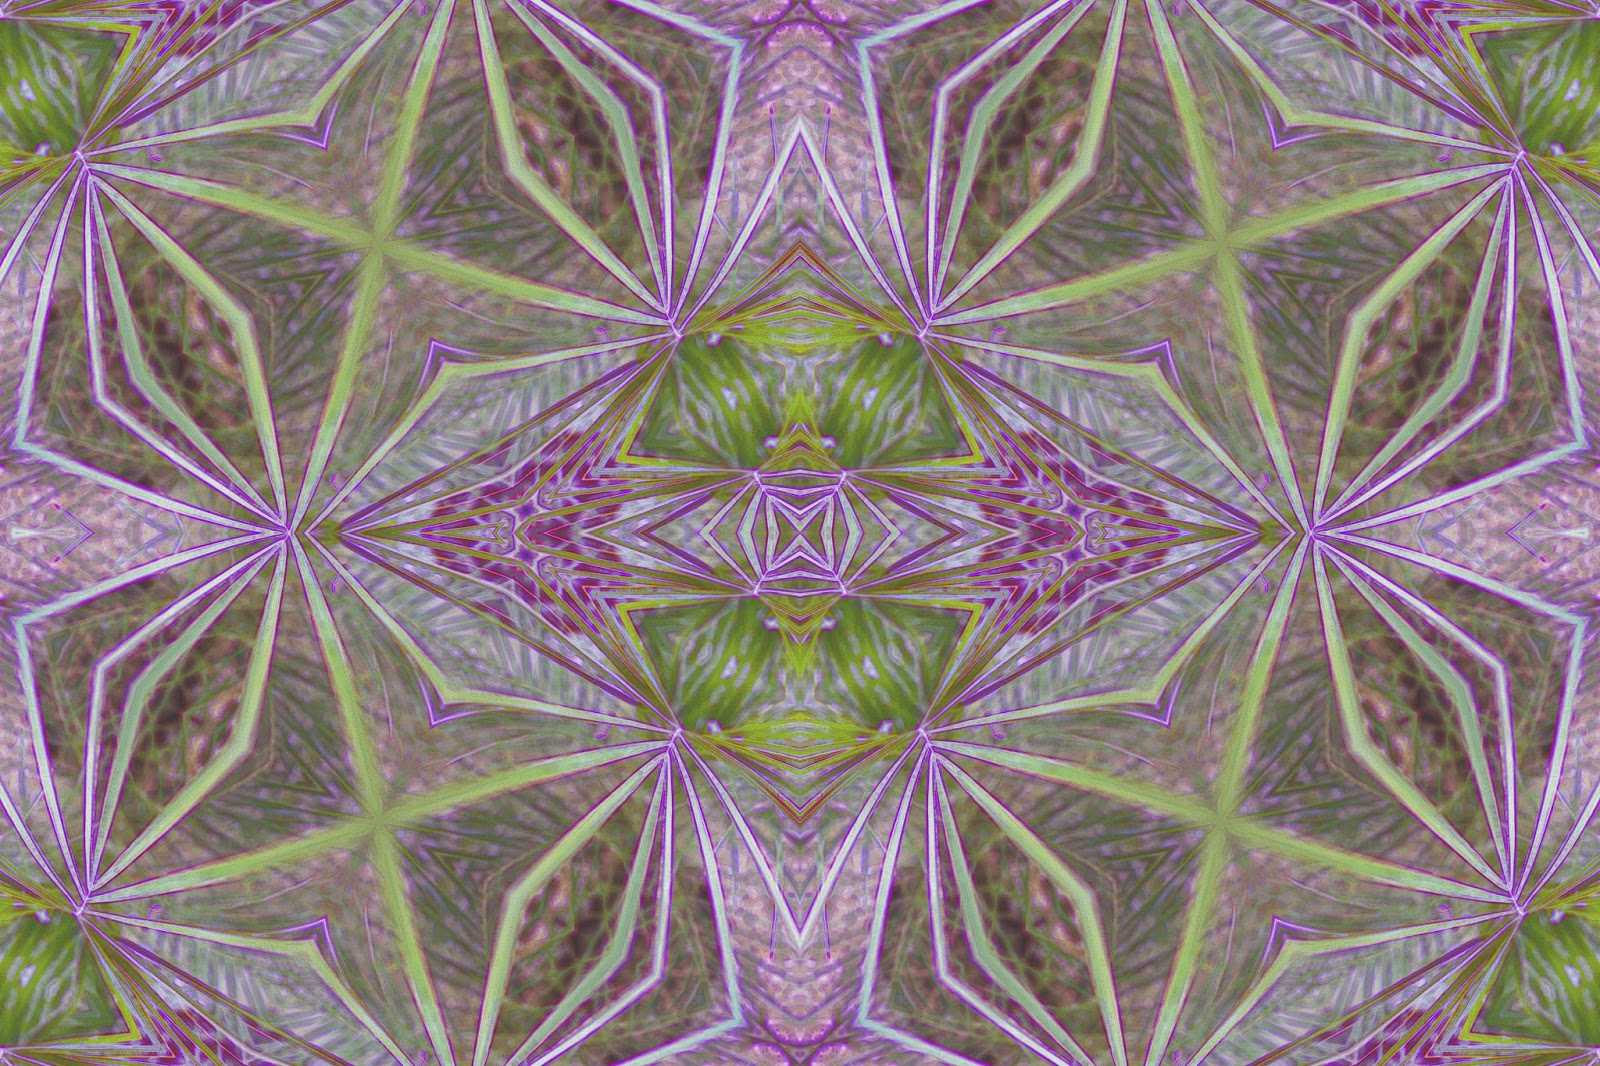
Here are a few things I did work on over the summer. From just one photo I took, I made these. I did take more photos than this one, but this one was a pretty one for creating digital fusion.


Okay, I've let a lot of things slip this summer, especially photography. To be honest, I don't think I have picked up my camera more than 5 times all summer, apart from a short vacation at the end of May. I find that sad.
Yet on the other hand, I haven't been exactly dormant when it comes to art. I've been exploring the other areas, as I mentioned in the previous post. Painting, oil pastels, colored pencils mostly, along with some collage and mixed media. Most of what I've done has been in art journals I have created from scratch after learning how from YouTube videos. (Anything you want to learn you can probably find a YouTube video about it.)
But now that summer is officially gone, some other things are now gone as well. First, I ended (temporarily maybe) my relationship with Fine Art America while I figure out what my next steps are going to be. I can always go back easily enough.
Secondly, I ended my relationship with Xanadu Gallery in Scottsdale, AZ. Granted this was only an online relationship as far as displaying my photography and digital fusion photography. My work was not on display within the storefront gallery. I could still continue to show up to 10 works of any kind of art for free, but without selling anything there, it was getting to be too much on my wee budget to continue paying for unlimited art display and a website. I gave them two years and that was quite enough. To be honest, that was a total experiment on my part from the start. Up until I had taken the email course to prepare for gallery showing, I had not even considered gallery shows. I was looking in a totally different area.
Thirdly, my Facebook page for my photography is on temporary hiatus while I decide what my next course of action will be.
I did keep my domain name even though at the present time it connects to nothing. I am exploring WIX for my next website. Then again, I might just take a swing at designing my next website myself. It wouldn't be the first time.
Okay, so Xanadu's gone. Fine Art America is gone. Facebook is gone. What's left?
Well there is this blog for one, (and the other one called page 2.) Flickr is still filled with my images taken over the past few years. And oh yeh, I am on ViewBug. Have you tried ViewBug? There are lots of fun contests and challenges. You can win prizes with the contests; and the challenges allow you to see how others like your work. You can also choose to sell your work on ViewBug. I have not tried that yet. I only have a few of my photos on ViewBug so far due to only uploading those that I think might do well in a contest or challenge. At this point, I am taking it quite slowly. It is a paid account for the pro status.
So, there you have it. Some major steps taken now that summer has ended and autumn is here with all its glorious colors. While I am still mostly spending time with the hands on type of art right now, my mind is working to make some decisions as to the next steps to take with my photography. One of the things I am considering is how to use my domain name since it only applies to photography. For example, should I keep the straight photography separate from the digital fusion photography? Should I place all the digital fusion photography into a fine art category? Xanadu got my mind on high pricing and I am just not that style photographer at this point. So I have a lot to think about and plan, and though I am not in any great rush, with only three more months left to the year I am thinking maybe to have something in place by the end of this year.
Here are a few things I did work on over the summer. From just one photo I took, I made these. I did take more photos than this one, but this one was a pretty one for creating digital fusion.


Tuesday, March 8, 2016
Winter Art Exploration
It's been a long winter; it's been a short winter. Whichever it has been for you, hopefully it has been a productive winter, a creative winter, and a healthy winter.
For me it has been a winter of exploration of art beyond and including photography. Previously I posted about using my photographs in mixed media artwork. This winter has been a time of great learning all about various types of mixed media artwork as well as the fun and addictive art of what is now known as Zen Tangle or Zen Doodle. I've spent many hours learning and practicing this art form with mixed results, most of which turned out pretty, although some were quite messy. I've incorporated them in new art journals as well as simply filling up colorful page after page of doodles in my sketch book. While some of the typical doodle patterns seem too difficult for me for now, most of them are very easy to do and gave me much new inspiration and creativity.
Along with doodling my winter away, I have found even more beautiful ways of using photography in mixed media artwork. Especially the kind of photographs I make using post editing of all sorts of photography subjects. I have always said that my designs would work beautifully in scrapbooking, but as winter comes to a close I am even more convinced that the possibilities are endless! The other day I browsed through some of my oldest designs on this blog and my other photography sites such as Flickr, and now Viewbug, only to realize that if I stopped taking photographs and turning them into strange and beautiful abstractions, I would still have an endless supply of art to use creatively in mixed media artwork.
On the other hand, while browsing, I discovered something not so wonderful, but still useful. That is that over time as I have taken on more and more new methods of creating my photographic artwork with new filters in my editing programs, I have forgotten much of what I used to do in the early days when I was still learning. This turned out to be a good value lesson for me though. I realized that it is not always necessary or even good to continually upgrade our abilities to create. While I go for the freebie options for filters and plug-ins for my editor, it shows me that maybe, at least for awhile, I should just stop looking for new things and spend more time going back over what I did in the early days. Maybe it is a good idea to re-explore everything I have right now to see what more can be done with it. There is a tendency sometimes to spend so much time with the new stuff that it can end up boring. Especially if you have allowed yourself, as I did, to forget that sometimes making do with what we already have can lead us into great discoveries.
For the next few weeks until the weather is warm enough to spend lots of time outdoors taking new photographs, my art exploration will include discovering more ways to combine my digital fusion photography with my mixed media artwork. Last year I created over 500 different patterns alone, not counting everything else I did with my photographs. Those patterns would make very interesting mixed media work. So I am thinking now that stocking up on a good supply of printer ink is very important as I am going to be printing off a lot of digital fusion artwork to be used on canvases and in art journals. I can't wait.
On a sad note, I said "Goodbye" to my Jonah. Jonah was my Shih Tsu rescue dog I had for 4 years. He was a good dog and rescued me in many ways too. After he passed, I decided to get a new companion. Meet KatieKat.


 You can see Jonah's photos under the tab dedicated especially to him. He is greatly missed.
I also became a grandma for the 9th time this winter. Photos of my grandchildren remain private, however.
Below are just a few of the projects I have been working on this winter.
 These are 4 examples of Zen Tangles or Doodle Art.


 These photos are of my first, believe it or not, toilet paper roll mini mixed media album. I saw several videos on YouTube for how to make these cute little books and had to try it. The toilet paper rolls become the pages which include pockets to add tags to. I found that this was a great way to use the sports photographs my grandchildren give me each year. For those who for whatever reason do not want to use toilet paper rolls, you can also use paper towel rolls cut into 2 or 3 pieces.

 Below are the 10 tags I made for sticking into the pockets I made. I painted one side with oil pastels and used colored pencils, notebook paper and antique buttons for the reverse side of the tags. The pencil shows just how small these little albums are. This is the same album in the photo of KatieKat above.


For me it has been a winter of exploration of art beyond and including photography. Previously I posted about using my photographs in mixed media artwork. This winter has been a time of great learning all about various types of mixed media artwork as well as the fun and addictive art of what is now known as Zen Tangle or Zen Doodle. I've spent many hours learning and practicing this art form with mixed results, most of which turned out pretty, although some were quite messy. I've incorporated them in new art journals as well as simply filling up colorful page after page of doodles in my sketch book. While some of the typical doodle patterns seem too difficult for me for now, most of them are very easy to do and gave me much new inspiration and creativity.
Along with doodling my winter away, I have found even more beautiful ways of using photography in mixed media artwork. Especially the kind of photographs I make using post editing of all sorts of photography subjects. I have always said that my designs would work beautifully in scrapbooking, but as winter comes to a close I am even more convinced that the possibilities are endless! The other day I browsed through some of my oldest designs on this blog and my other photography sites such as Flickr, and now Viewbug, only to realize that if I stopped taking photographs and turning them into strange and beautiful abstractions, I would still have an endless supply of art to use creatively in mixed media artwork.
On the other hand, while browsing, I discovered something not so wonderful, but still useful. That is that over time as I have taken on more and more new methods of creating my photographic artwork with new filters in my editing programs, I have forgotten much of what I used to do in the early days when I was still learning. This turned out to be a good value lesson for me though. I realized that it is not always necessary or even good to continually upgrade our abilities to create. While I go for the freebie options for filters and plug-ins for my editor, it shows me that maybe, at least for awhile, I should just stop looking for new things and spend more time going back over what I did in the early days. Maybe it is a good idea to re-explore everything I have right now to see what more can be done with it. There is a tendency sometimes to spend so much time with the new stuff that it can end up boring. Especially if you have allowed yourself, as I did, to forget that sometimes making do with what we already have can lead us into great discoveries.
For the next few weeks until the weather is warm enough to spend lots of time outdoors taking new photographs, my art exploration will include discovering more ways to combine my digital fusion photography with my mixed media artwork. Last year I created over 500 different patterns alone, not counting everything else I did with my photographs. Those patterns would make very interesting mixed media work. So I am thinking now that stocking up on a good supply of printer ink is very important as I am going to be printing off a lot of digital fusion artwork to be used on canvases and in art journals. I can't wait.
On a sad note, I said "Goodbye" to my Jonah. Jonah was my Shih Tsu rescue dog I had for 4 years. He was a good dog and rescued me in many ways too. After he passed, I decided to get a new companion. Meet KatieKat.


I also became a grandma for the 9th time this winter. Photos of my grandchildren remain private, however.
Below are just a few of the projects I have been working on this winter.


Friday, November 27, 2015
Using My Photography For What????
Oh my gosh! I hadn't realized it had been so long since I last posted here. Time has flown the past few months. I've moved to a location much better suited for my work as well as my play. But really my work IS play for me. But in addition to this, I've discovered something totally new, for me anyway, and that is mixed media art and mixed media art journals. So I have spent much of the past couple of months anyway, learning as much as I can so I can be able to do this kind of art properly.
No, don't worry. I am not leaving my photography behind, although it seemed like it there for awhile. Actually, I think I want to find a way to incorporate my photography into my mixed media artwork. I think this would be so much fun as well as how it would make the ephemera (new vocabulary word for me) I use in the artwork totally my own instead of things I find elsewhere. Or maybe a combination of both.
So, what I did in October and the first half of November was to create my first mixed media art journal. Now the problem I had with this is my own impatience because I wanted to be able to do everything right away even though I don't even have all the kinds of supplies I need to do so. For instance, stencils. And stamps. And that darn ephemera. I also do not have a lot of options in the mixed media types of pigments such as watercolors and inks. I do have colored pencils, black Sharpie pens (so far) and acrylic tube and bottled paints. But to compensate, I used the computer to find and print out and then cut out or tear out various pictures of possible things I might want to use. That didn't work as well as I had hoped, but to that I blame on not being well versed in this kind of artwork yet. I learned how to make some of the things I will need also and have begun making my own stencils, and stamps out of things found around the house. I think the most unique of these items has been the mallet end of a broken meat pounder (tenderizer). It makes pretty cool dots in pattern and in two different sizes. My best and favorite, so far, homemade ephemera or paper has been plain old coffee filters I've been using to blot excess paints both on the artwork itself and on the pallets. Blotting over and over on the filters has thickened the paper quite a bit and I have finally used some in a mixed media canvas that turned out interesting.

Now I am looking at ideas for how to do this using my own photography in different parts of my art. I think that especially the abstract photography or digital fusion photography will work best in my abstract art. I am not sure yet how I would use landscapes, florals, or other photographs, but I am sure I will figure that out. There is one layout in my art journal where I cut out flowers from actual photographs and put them into the design. But they are thicker and heavier than the rest of the page they are put on so they required a heavier amount of gel medium to hold them down and cover them well. I used glossy gel medium which took longer to dry properly even though it felt dry to the touch. When turning the pages, they ended up sticking together and did some major damage I am not sure I can repair. So I have decided for now to use my own printouts of my photos on regular computer paper or maybe card stock instead of photos from the photo developing places.
Then, some sad news, my little Jonah ended up needing to be put to sleep as he was in obvious last stages of his life. He was having increasing difficulty walking and holding his bladder, as well as no longer eating after vomiting his last meal a whole day after he ate it. It was very hard to let him go but it was harder to watch him struggle and have bouts of pain where he would make sounds I never knew a dog could make. You can see more photos of Jonah in his own tab at the top of the page.

This past week I have focused on my photography again because I knew I was away from it for too long. I've done some still life photos of fresh vegetables prior to making homemade tacos, and then later some still life photos of marbles and a flower vase with some different backgrounds, such as felt pieces, and the mesh wrappers that come on fresh fruit. After that I went on to do some digital fusion artwork with the still life photos and have been posting those to my Flickr photostream. Here is one example that turned out looking like a big open mouth on a fish...but hey, to you it might look like something totally different. What beautiful dark blue eyes this fishy has!

So, this being very early the morning after Thanksgiving, I want to say that I hope you had a wonderful day and spent some great time with family and friends. Or if you are like me and having your holiday on a different day to accommodate various scheduling issues, I wish you a happy Thanksgiving yet to come. The Christmas season has officially begun and that means a lot of different things to different people. For me it means a celebration of the greatest man who ever lived, Jesus Christ. It's a busy time for many and I hope I will be back on here before this year is ended. But, if I don't make it, Merry Christmas and Happy New Year!
Friday, August 14, 2015
Colorful Digital Fusion Photography Tutorial
Hey there! It's that time again. I just completed a set of digital fusion photographs that I thought would make a great tutorial. I recently moved to a new location in the same town but it offers many more photographic opportunities than I have previously had. So I've been spending time taking some pictures just for more practice than anything else, but came up with some pretty cool shots. But not all of them came out clearly in focus the way I wanted them. Oh some parts were focused but not the parts I was aiming for. Need more practice there. But there was one very colorful photo I took that wasn't really all that bad, but definitely wasn't good enough to stand alone. There are little flower and vegetable gardens all around me here and in this one little garden is a planter of a darling little girl sitting on a garden bench holding a basket of hens and chickens. The hens and chickens did not focus as well as I thought they did. But other parts of the photo were okay. But as I said, it is the color combinations that are truly fascinating for this tutorial.
Here is a photo of the full planter.

Below is the photo I am using for today's tutorial. For your purposes, this time find something with some good color dynamics as well as some different textures, lines, and angles and then take your picture.

*Reminder: I am using Corel Paint Shop Photo Pro X5. But you can use Photoshop or other software of your choice. The settings may not have the same names but this is your chance to explore what your software can do for you.
The first thing I chose to do was to highlight all the lines and angles by using the effects filter in the default grouping called "Artistic Effects" and within the group the effect called "Glowing Edges." I love the black light poster or black velvet style poster that results.

I'm going to work with this at a later time. For this tutorial, I want to continue using the original colors. This next photo I used a default effects grouping called "Distortion Effects." Within the group I chose "Polar Distortion" and got this result.

Hmmmm. What do you think?
Normally at this point I will back track and go back to the original for each new effect. But I liked the oddness of this one so I used it for the following results. These were all done using various settings in the downloadable filter effect group called Medhi. This is one of my favorite filter groups and it is usable for both Corel and Photoshop. It is also free. Within this group is a favorite "Kaleidoscope" effects with lots of variable settings. (The great thing about the colors and textures of this photo is that I have only just started creating new designs and there are so many more possibilities I can work with. This is why this time you are to make a photo of something colorful and textured.)
The following are just kaleidoscope variations from the Mehdi group that I chose to use. At this point, you can do what I have done, or experiment on your own with whatever special filter effects your software provides, download other filters if possible, and go from there. These are what I did so far.


If I wanted to, I could probably go back to the Kaleidoscope and use it on the original photo as well and come up with all new versions. I am not sure yet if I will do that or not. I am always excited when I somehow manage to make hearts as in the bottom one here.
Wednesday, July 1, 2015
Another Fun Abstract Tutorial
As I was just looking back over some of my posts and especially at previous tutorials, I thought it would be fun to do another one. So, here goes. And as usual, I'm using a really bad photo to start with. But to its credit, the photo has some really good colors and lines and textures to work with. This photo here is one of the absolute worst I have ever taken. Why it turned out so bad is a whole other post. It's just bad and it isn't the only one I took that day that turned out bad.
Remember, to get the full effect of this tutorial, double click on the photo to get full screen.

So, just to take some time out to experiment with some software settings I had not used before, I decided to see what might happen if I tried a few. This was using curves intense. This was the only one I liked. And really, it's BAD. There's nothing redeemable about it. Or is there?

Well, there is color. There are lines, angles, textures. Hmmm...
I decided to try out my favorite kaleidoscope filter from the Mehdi group. This setting was 2 petals, 0 offset, 0 rotate, and 1 zoom out. Well, now that's interesting. The more I look at it, the more I like it. Yet, I'd like a little less white.

This time I wanted to see what would happen if I worked on the
colors only. So I tried Luminares Color Glow. Wow, I love this shade
of blue, but this is a little overboard. But I'm not giving up. I'm
seeing more and more potential here. So I keep going.

Back to the ole favorite kaleidoscope. This time it was 2 petals,
46 offset, 0 rotate, and 1 zoom out. That's much better. But I'm not
finished yet.

Okay I don't really like all that blue even though it is interesting. So I back up a couple steps back to the kaleidoscope directly above the first blue picture. Yep, that's the one, with the all white pickets going across the middle and the colors top and bottom. This time instead of more kaleidoscopes, I chose to use Toadies filter group and the filter called Picasso's Other World. You can certainly see the cubism there. I am really liking this one. But let's see what else can be done.

At this point, still avoiding more kaleidoscopes because there are just times when I can almost feel that I need something totally different, I have chosen the same filter group that has the kaleidoscope filter. But this time I have chosen a filter called Melt within the Mehdi filter group.

Wanting to give it something...not quite sure what yet...but I am trying the filter group called Simple and the effect called Blintz.

Well that has possibilities, but I've still not gotten what I am looking for, and that is something that just pops out at me and says, "YES! This is it!"
So now I am going to try one more very easy filter that comes with the Paint Shop program and that is found under the title of Distortion Effects. The effect is called Displacement Map.

And that's my YES!
I could keep going, but I am going to stop there. I am happily satisfied with this result and feel that I have gotten not one but two pretty awesome pieces of art out of this. The first one is the one where I used the Picasso's Other World and got such an interesting cubism piece. And then this last one above here.
So did you follow along and do some experimenting of your own? I hope so. That's what makes this fun.
Subscribe to:
Posts (Atom)